
How to Clean Leather vs. Cloth Seats (Different Rules, Different Damage)

Armando’s girlfriend says his car is too gross for words. It’s leather, and his old scrubbing routine won’t work. Here’s how to clean leather without wrecking it.

Armando has never cleaned anything on purpose. His old car’s interior stayed presentable through a combination of low standards and cloth seats that forgave everything. Then his girlfriend sat down in the new car, looked around, and told him it was “too gross for words.” She then found several words anyway.

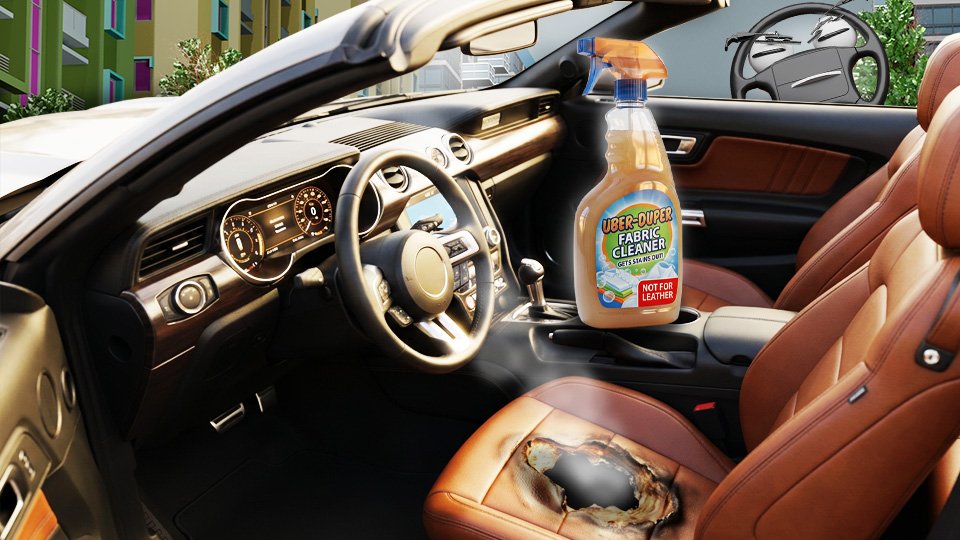
The new car has leather seats, which means the old routine of scrubbing hard with whatever was under the sink is about to go very badly. He found a bottle labeled Uber-Duper Fabric Cleaner, which is a name that sounds like a promise and should have been a warning. The seat’s reaction was dramatic.

(The hole is artistic license. Real leather damage is slower and sneakier: a dull finish, a tacky feel, and eventually cracks.)

🧵 Why Leather and Cloth Need Different Products

Cloth is woven fiber, so dirt hides down in the weave and needs foam and a brush to lift it out.

Leather is a finished, coated hide with no weave to dig into, but its surface finish can be stripped, dried out, or discolored by harsh solvents and high-alkalinity cleaners.

The cleaner that rescues one will quietly damage the other.

🪑 Leather Seats: The Armando-Proof Routine

  1. Vacuum first. Use a soft brush attachment and get into the seams, where crumbs and grit hide. Grit rubbed into leather works like sandpaper.
  2. Test a hidden spot. Try the cleaner on a low, out-of-sight patch before the driver’s seat bolster.
  3. Clean gently. Spray a dedicated leather cleaner onto a soft brush or microfiber towel (not straight onto the seat), and work it in small sections, and lift the dirt with a clean towel. No scrubbing.
  4. Dry it. Wipe each section with a dry microfiber towel. Don’t let cleaner sit.
  5. Condition every time. Cleaning removes dirt and some natural oils, and conditioner puts moisture back. Apply a thin coat, let it absorb, and buff off the excess.
  6. Keep it out of direct sun while it dries, and repeat every few months.

🧵 Cloth Seats: Clean, Then Dry Fast

Cloth is the forgiving one. But it’s not without its challenges.

To wash:

Apply a fabric-safe foaming cleaner directly to the seat in small sections, work it in with a soft brush. The foam loosens the dirt particles and the brush pulls them away.

Press a dry microfiber towel firmly into each section and lift. This pulls moisture and loosened dirt out of the cushion. Switch to a dry part of the towel as it gets damp.

To dry the seats, open the doors or windows, or run the car’s fan or heater with the windows cracked. A small fan pointed at the seat speeds it up a lot. Cloth doesn’t mind sunshine the way leather does, so parking in the sun with the windows cracked works well.

A cloth seat that stays damp can develop odor or mildew deep in the cushion where you’ll never see it coming.

⚠️ The Mistakes Worth Avoiding

  • Never use fabric cleaner on leather. It’s too harsh and strips the finish.
  • Never use leather conditioner on cloth. It leaves an oily residue the fabric can’t absorb.
  • Skip stiff brushes and household cleaners on leather. That includes dish soap, all-purpose spray, and anything under the sink.
  • Check your manual or seat tag if you’re not sure what you have. Some “leather-look” vinyl needs its own approach.
  • Some damage no cleaner fixes. A burn, tear, or hole needs a repair kit or an upholstery shop, not another spray.

🛠️ Gear Worth Having

Chemical Guys Leather Cleaner and Conditioner Kit — a matched two-step system so you’re never guessing whether you’ve conditioned enough.

Leather Honey Leather Conditioner — a long-trusted, simple conditioner for keeping leather supple between deeper cleanings.

Horsehair Detailing Brush — soft enough to work cleaner into the grain and seams without scratching.

Microfiber Towels — you’ll want a stack so you can wipe, dry, and buff without reusing a dirty one.

Chemical Guys Foaming Citrus Fabric Clean — the cloth-seat counterpart. Keep it far away from the leather bottle in your garage.

As an Amazon affiliate, I earn from qualifying purchases. Thank you for supporting GrumblePark.

🔗 Related Reads


GrumblePark is part of the WhistleBump group – find the rest of the family at WhistleBump.com.

40007

©2026 John D Reinhart/GrumblePark.com — All rights reserved

Bug and Tar Removal Without Damaging Your Paint

Bug guts are acidic and tree sap doesn’t budge with soap. Here’s how to get both off without a scrub-induced scratch.

Meta description: Bug guts are acidic and tree sap doesn’t budge with soap. Here’s how to get both off without a scrub-induced scratch.

SEO tags: bug removal, tar removal, tree sap, paint safe cleaning, road grime

Bug and Tar Removal Without Damaging Your Paint

Armando drove three hours down a rural highway one summer evening and arrived with a front bumper that looked, by his own description, “like a crime scene for insects.” His instinct was to scrub. His instinct was wrong, and it’s the same wrong instinct most people have.

🪲 Why Bug Splatter Is Worse Than It Looks

Yeah, they’re gross – eyeballs and guts and wings and stuff glued right there to the front of your car. Some cars wear them as a badge of honor: hard-earned highway stripes.

But, here’s the problem with that: bug remains are acidic.

That acidity actively etches into your car’s clear coat the longer it sits — baked on by sun and highway heat, a fresh splatter that would rinse off in seconds can become a permanently etched mark within days if ignored.

If pitted paint is your thing, this is great news.

For the rest of us, speed matters way more than technique here.

❌ The Scrubbing Instinct Is the Problem

Anybody’s first instinct would be to grab a rag and wipe away those remains. Maybe some water to help loosen it. That would work if the bug or the tar was clean, and the spot where they hit your car was, well, spotless.

Sadly, very little in the automotive world, especially highway travel, is spotless.

Scrubbing dried bug residue or tar with a rag actively grinds whatever grit is embedded in it directly across your clear coat — creating the exact fine scratches a careful wash is trying to avoid.

The fix isn’t more elbow grease; it’s the right chemical doing the work instead of your arm.

🧪 Let the Product Dissolve It First

A dedicated bug and tar remover is formulated to break down the squashed bug’s chemical stickiness, breaking its bond to the paint on its own.

Spray it on, give it the adhesive-loosening time the label specifies (usually a minute or two), and it should wipe away with minimal pressure.

If you’re pressing hard to make progress, you’re back to grinding the bug into the paint. Give the product more time, as it hasn’t finished working yet; give it more time rather than more force.

🛣️ Tar Is a Different Animal

Like a dropped egg, a bug hit is all about managing the stickiness of its protein guts.

But splothces of stuff like road tar and asphalt won’t respond to a standard bug remover the same way. These man-made chemicals are petroleum based.

Luckily, there are products specifically rated for tar and adhesive removal. They won’t work on squashed bugs any better than bug-removers work on tar. You’ll need both!

🌲 And Then There’s Tree Sap

Park under the wrong tree for an afternoon and you’ll come back to find little amber blobs stuck to your hood or windshield, looking like your car sprang a leak from somewhere above.

Sap isn’t bug guts, and it isn’t tar. It’s basically a tree’s version of glue, and the longer it sits in the sun, the more it hardens — going from a soft, sticky drop to something closer to a tiny cemented rock glued to your paint.

It’s also mildly acidic on its own, same as bug splatter, so it deserves the same urgency: the longer it bakes there, the better its odds of leaving a stain or a dull spot behind even after you finally scrape the thing off.

The good news, if it’s fresh: a warm, damp cloth alone can soften a new drop of sap enough to lift it right off, no chemicals required. If it’s had a few days to harden in the sun, a little rubbing alcohol on a cloth, held against the spot for a few seconds before wiping, breaks its stickiness down safely.

And if you’ve already got tar spots to deal with in the same wash, good news twice over — the same tar-and-adhesive remover handling your asphalt splatter takes care of sap too. One bottle, three different messes.

🛠️ Gear Worth Having

Chemical Guys Bug and Tar Remover — fast-acting and paint-safe, built specifically to dissolve rather than require scrubbing.

Griot’s Garage Smudge Remover — handy for general grime, scuffs, and oily smudges beyond just bugs and tar.

Rain-X Pro 3-in-1 Bug, Tar and Adhesive Remover — covers the tar-and-sticker-residue side of the job in one bottle.

As an Amazon affiliate, I earn from qualifying purchases. Thank you for supporting GrumblePark.

🔗 Related Reads


GrumblePark is part of the WhistleBump group – find the rest of the family at WhistleBump.com.

40008

©2026 John D Reinhart/GrumblePark.com — All rights reserved
How to Wash Your Car Without Swirling the Paint

That satisfying squeaky-clean feeling might actually be tiny scratches forming in real time. Here’s how to avoid it.

Meta description: That satisfying squeaky-clean feeling might actually be tiny scratches forming in real time. Here’s how to avoid it.

SEO tags: car wash technique, swirl marks, paint safe washing, two bucket method

How to Wash Your Car Without Swirling the Paint

Armando has washed his car in the driveway every other Saturday for as long as he’s owned it, using a single kitchen sponge and whatever dish soap happened to be under the sink, and has never once connected this ritual to the faint spiderweb of fine scratches that shows up on his hood under direct sunlight. He assumed that was just what a car’s paint eventually looked like. It is not. It’s swirl marks, and they’re entirely avoidable.

🌀 Where Swirl Marks Actually Come From

Swirl marks are thousands of microscopic scratches in the clear coat (the transparent, protective top layer over your car’s actual paint color), and they happen almost entirely from the washing process itself — specifically, from grinding trapped dirt across the paint with whatever’s doing the wiping. A dish sponge, in particular, is a swirl-mark factory: it’s designed to scrub, not glide, and it holds grit against the surface instead of releasing it.

🧼 The Soap Matters More Than You’d Think

Dish soap is formulated to strip oil and wax — which is exactly what it does to whatever protective layer is already on your paint, leaving it more exposed to the elements. A dedicated car wash soap is pH-balanced specifically not to strip that layer, cleaning without undoing whatever protection you’ve already put down.

🪣 The Two-Bucket Method

When you’re washing the car, you need two buckets, not just one.

One bucket holds clean soapy water; the second holds plain rinse water.

Dunk your wash mitt in the soap bucket, wash a section of the car.

Then dunk it in the plain rinse water bucket. Swirl it around to release the grit it just picked up.

Then dunk it back into the soapy water and take it back to the car.

Reloading a dirty mitt straight from just one bucket is the single biggest cause of swirl marks in an otherwise careful wash.

Two buckets. Seriously.

🧽 Top to Bottom, Not Random

Wash from the roof down, saving the lowest, dirtiest parts of the car — rocker panels, lower doors — for last, ideally with a separate mitt or at least a final rinse before touching them again.

That grime is the coarsest, most scratch-prone dirt on the whole car; the last thing you want is to drag it up into panels you already cleaned.

🚗 Drying Without Undoing All That Work

Letting a car air-dry leaves mineral deposits (water spots) baked on by the sun.

A clean microfiber towel, not a bath towel or an old towel from the back of the garage, is what you use to dry the car. Everything else leaves behind lint and it’s own history of dust and grit.

Don’t go wiping the towel in long, straight lines along the fender panels – any grit that’s still on the car or in the towel will make a nice, long scratch. Swirling the towel as you dry will make a nice spiral you’ll see in the reflection.

Blot the water off the car – attacking one section at a time.

And dry the windows last. They are particularly good at holding onto water and will soak your microfiber towel in the blink of an eye.

🛠️ Gear Worth Having

Chemical Guys Mr. Pink Car Wash Soap — a pH-balanced formula that cleans without stripping whatever wax or sealant is already protecting your paint.

Chemical Guys Chenille Wash Mitt — dense microfiber that lifts dirt away from the surface instead of grinding it in like a sponge does.

Meguiar’s Gold Class Car Wash — a rich, conditioning formula that’s been a driveway staple for a reason.

As an Amazon affiliate, I earn from qualifying purchases. Thank you for supporting GrumblePark.

🔗 Related Reads


GrumblePark is part of the WhistleBump group – find the rest of the family at WhistleBump.com.

40001

©2026 John D Reinhart/GrumblePark.com — All rights reserved